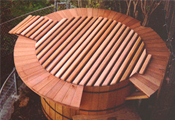
Highest Quality Insulating Spa Covers Easiest to Open, Rolling Hot Tub Covers Extremely Durable Aluminum Hot Tub and Spa Covers Floating Thermal Spa Blankets

Covermate III

THE PERFECT ANSWER WHEN CLEARANCE BEHIND YOUR SPA IS AN ISSUE

Customer Comments


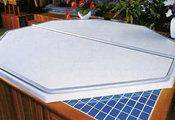
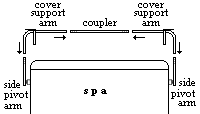
The CoverMate III spa cover lifter is made of weather resistant components that will provide years of trouble free performance. Strikingly different in design from other cover lifts, the Covermate 3 is the perfect cover lift when clearance behind is limited (requires only 6" of clearance behind your spa). The Covermate3 places the spa cover in an upright position. Your spa cover will last longer and be very easy to operate using the Covermate 3. Made of durable aluminum and has a black powder coated finish for years of trouble-free performance. The standard Cover Mate 3 mounts directly to the spa cabinet making it idea for spas housed in gazebos. The "deck-mounted" CoverMate 3 is designed to attache to a deck which is built flust to the top of the spa.

No other hydraulic cover lift offers the beauty, reliability and superior operation of the CoverMate III. Our exclusive wind lock system is the only one of its kind - designed to eliminate broken shock syndrome that other hydraulic lifts experience. Combine that with an aluminum full-frame construction and our stylish composite mounting brackets, and you've given your customers a perfect option with no heavy lifting.

- Requires just 6 inches of clearance behind spa
- Powdercoated, aluminum tubing
- Euro-styled composite brackets with beauty covers that hide mounting hardware for a clean look
- Ergonomically designed for ease of use
- Available with extended pivot arms and extended brackets for larger spas
- Available with optional DeckMount bracket (sold separately)

Installation / Operating requirements and limitations

rear clearance side clearance spa/cabinet shape limitations mounting location spa corner shape limitations type of lift assistance min. [max.]cover width
6" 6" not for round skirted spas deck or side requires "extended bracket" if radiused corners over 15" or cut corners over 20" gas shock  

See the complete Cover Lift Configurater to compare all cover lifters side by side.

Cabinet Mount
$228.95

return/refund policy

Deck Mount
$248.95

return/refund policy


Click on pictures above for a larger view


Cabinet Mount
$228.95

return/refund policy

Deck Mount
$248.95

return/refund policy


Installation Instructions for the Covermate III

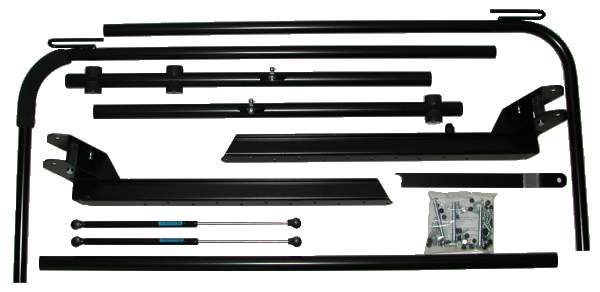
What's actually inside the box.

covermate3fig1.gif (2047 bytes)
Figure 1 - Installation of mounting brackets


covermate3fig2.gif (2784 bytes)
Figure 2 - Attaching the pivot arms


covermate3fig3.gif (2152 bytes)
Figure 3 - Installation of windlock bar.


covermate3fig4.gif (2500 bytes)
Figure 4 - Installation of wind lock bar.


covermate3fig5.gif (2192 bytes)


covermate3fig6.gif (1955 bytes)
Figure 7 - Assembly of support arms to pivot arms.


covermate3fig7.gif (1495 bytes)
Figure 8 - Positioning Covermate3 on spa.


covermate3fig8.gif (2322 bytes)
Figure 9 - Installation of retainer clips.


covermate3fig9.gif (2429 bytes)
Figure 10 - Installation of safety lockdown strap.

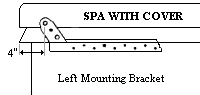
Step #1
Position the spa cover (in closed position) on the spa making sure that all four corners are properly positioned and square an the spa.
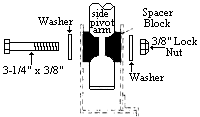
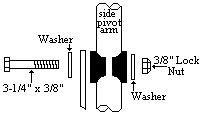
 

Step #2
Using the #10x1" screws attach the left and right Mounting Brackets to the appropriate sides of the spa.
NOTE: Brackets can be mounted directly to the Top rail of the Spa or to the side wall of the Spa.
Caution: To prevent splitting of wood cabinet pre-drill hales with a I/16’drill bit.


Step #3
Connect the Pivot Arms to the Mounting Bracket (See Fig.2) After Pivot Arms are connected tilt them back into the upright position.


Step #4
Using the3 I/4 x3/8' Bolt and Nut attach the Wind lock Bar to the inside edge of the left side Pivot Arm (see Fig.3 and Fig 4). Slightly overtighten Nut and Bolt and then loosen so that Wind Lock swings freely.
Note:Be sure that Lock Nut is on outside edge of Pivot Arm.


Step #5
Attach Ball Stud to each Bracket using the 5/16 Nut and Washers provided (see Fig. 5).
Note: Install Ball Stud so that the Ball end points inward toward the spa (see Fig.5). Next- slip the Bell Stud Straps over the end of the Pivot Arms and position so that Pilot Hole on Ball Stud Strap lines up with Bottom Pilot Hole on Pivot Arm. Insert #10 self tapping Screw and tighten Ball Stud and Nut (see Fig.6).
Note: Be sure that the Ball is pointing outward, away from the Spa.
Caution: Do not install Shocks at this time.


Step #6
Slip the Lock Down Straps on to the long end of each Support Arm (see Fig )/. Next slip the Cover Retainer Clips on to the long end of the Support Arms (see Fig. 7). Note: there is a left side and right side Retainer Clip. Next slip The long end of the Support Arms into the Center Coupler Piece. Then slide Support Arms into the Pivot Arms (See Fig. 7).


Step #7
Lay the Covermate on the spa cover. Adjust the Coupler Piece and Support Arms so that the Coupler Piece is lying parallel to the spa cover's hinge about a 1/2'away. (See Fig. 8) Using the #10 self tapping screws fasten Support Arms to Pivot Arms and the Coupler Piece.
Note: Be sure to rotate the Coupler Piece so that the inserted screws are at a horizontal angle with heads facing the back of the spa.


Step #8
Position Retainer Clips so that the vertical portion is centered between the two Cover Halves and the horizontal portion touching the underside of the cover is inset from the outside edge cover approx. 3/4" on the inside of the Cover Skirt. Using a #10 Self Taping Screw – Screw Retainer Clip into final position (See Fig 9).


Step #9
Adjust length of Safety Lock Down Strap and attach Buckle portion to side of the Spa (see Fig. 10).


Step #10
Using the Covermate, lift the Cover off the Spa and place in the upright position. Snap the Gas Shocks on to the Ball Studs.
Note: Be sure to install Gas Shocks with black body on top.


Step #11
Slip the black hand grips to the edge and snap black plastic screw head covers on. You are done!

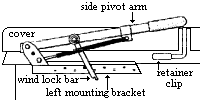
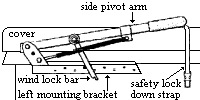
Operation of Covermate lll

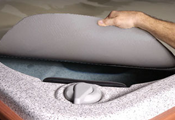
  1. Fold the first half of the Spa Cover over.
  2. Unbuckle Safely Lockdown Straps.
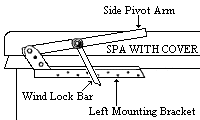
  3. Grip the bar with the foam grip and start pulling upward. The hydraulic shocks will do most of the work to bring the cover to a fully opened position. (The Wind Lock Bar engages automatically when the cover is open.)
  4. To close the cover, get out of the tub and go to the side of the spa that has the Wind Lock Bar. The cover will not properly close if the Wind Lock Bar is not disengaged, and damage to the cover lifter or spa cover can occur. Lift up on the Wind Lock Bar, grab on to the bar with the foam grip and pull the cover down until it is resting on the spa. The hydraulic shocks will do most of the work to bring the cover to a closed position.
  5. Fold the top half of the cover back onto the spa. Position the spa cover on the spa, making sure that all four corners are properly positioned and square on the spa.
  6. Buckle Safety Lockdown straps.

Cabinet Mount
$228.95

return/refund policy

Deck Mount
$248.95

return/refund policy