


Ideal E-Z Lifter
FOR SIMPLE SPA COVER REMOVAL


 |
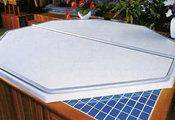
So simple to use, you'll wonder how you ever managed without it. One easy motion lifts any cover up to 96" and stores it in an upright position! Requiring just 18" of clearance from any wall in order to function properly, this cover lift reduces wear and tear on your spa cover. Made of anodized aluminum, it holds up well against weather extremes and will look new for many years to come. An adapter kit is available for round, oval, uncommonly shaped and larger spas and also accommodates alternative cabinet materials and styles. Easily assembled, the E-Z Lifter fits most spas or decks, and attaches to the base of your spa or deck. No need for large mounting plates or permanent cover attachments. Simple, durable and reliable. The E-Z Lifter is the affordable spa cover removal system you can depend on.
|


Installation / Operating requirements and limitations |
||||||
| rear clearance | side clearance | spa/cabinet shape limitations | mounting location | spa corner shape limitations | type of lift assistance | min. [max.]cover width |
| 18" | 3" | special bracket for round spas | side only | none | none | |
See the complete Cover Lift Configurater to compare all cover lifters side by side. |
||||||


Click on pictures above for a larger view
Installation Instructions for the E-Z Lifter
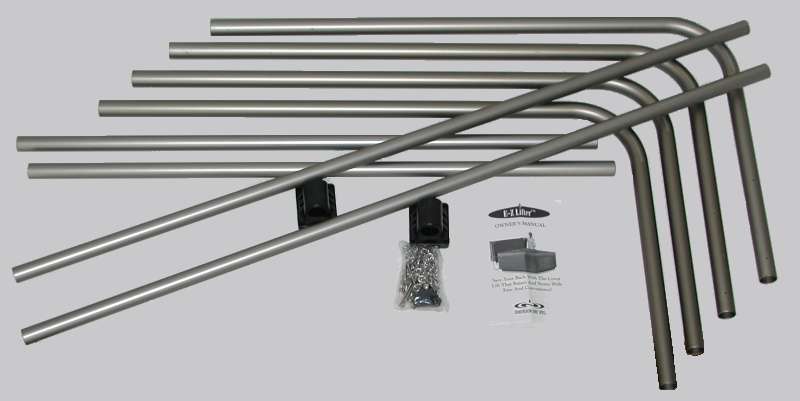
What's actually inside the box.
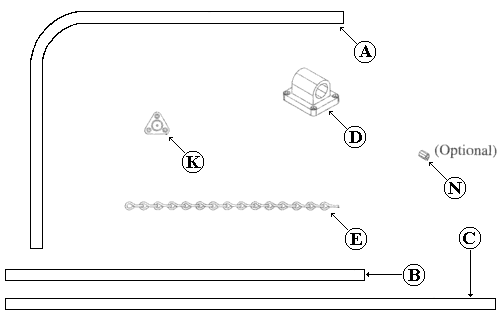
| Part | Description | Quantity | Part | Description | Quantity | |
| A | Corner Piece | 4 | G | Wood Screw | 8 | |
| B | Side (Short) Arm | 2 | J | #10 Flat Washer | 6 | |
| C | Bridge (Long) Arm | 2 | K | Chain Mounting Bracket | 2 | |
| D | Mounting Block | 2 | L | Machine Screw (#8-32 X 5/8") | 2 | |
| E | Safety Chain | 2 | M | Wood Screw (#8 X 3/4") | 6 | |
| F | Metal Screw (#l0 X 3/4") | 18 | N | Plastic Grommet (optional) | 2 |
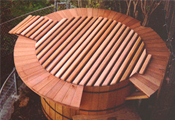
When assembled, the E-Z lifter is rectangularly shaped and attaches at the pedestal base (or bottom) of the spa. When the cover is folded, the E-Z Litter holds it upright (vertically) when removed from the spa top (see Figure 1). The following instructions are for most rectangular spas with exterior dimensions under 96". A special adapter kit will be needed for spas of any other shape, which can be obtained from your E-Z Lifter Dealer.
The E-Z Lifter expands to fit most spas and pilot holes have been pre-drilled in the comer pieces. The provided self-tapping screws will penetrate the bridge arms and the side arms to complete the E-Z Lifter size and shape for your particular spa.
NOTE: Before beginning the assembly, please read through the directions and familiarize yourself with the parts list.
NOTE: Each corner piece has a long and short side. The long sides of each corner piece are positioned at the bottom and top of the spa facing toward the center of the spa (horizontal to the ground when the E-Z Lifter is upright). The shorter sides of the corner pieces are positioned at the sides of the spa (vertical to the ground when the E-Z Lifter is upright).
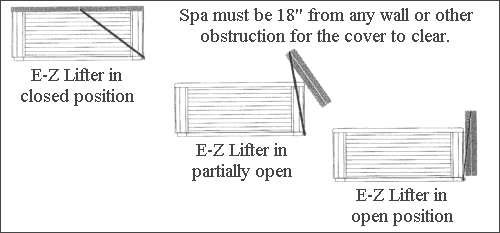
FIGURE 1
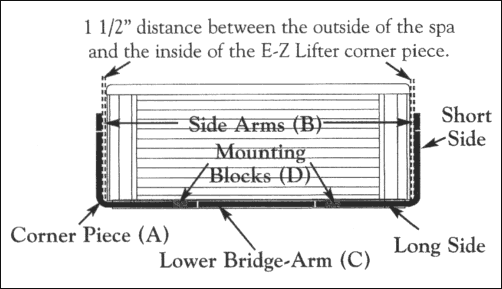
FIGURE 2
ASSEMBLY:
Place the cover on the spa in the orientation that it will open. Measure the outside dimension (width) of the spa, parallel to the spa cover seam. (In many cases you can measure the spa cover seam.) Add approximately 3" to this measurement for the actual dimension of the E-Z Lifter width. This will allow for a 1 1/2" clearance from the side arms to the spa.
Slide the 2 mounting blocks (D) on the 2 long sides of the comer pieces (A) at the bottom (or base) of the spa. Then slide the lower bridge (long) arm (C) into the 2 long sides of the Z comer pieces. The E-Z Lifter shape should now be an open rectangle or square with 3 sides and have 2 mounting blocks at its base.
Insert the 2 side (short) arm pieces (B) into the short ends of the corner pieces (A) with the holes facing up (see Figure 2).
Slide the remaining bridge (long) arm (C) into the 2 long sides of the remaining corner pieces, as in Step 2. Now take the short sides of these 2 corner pieces and slide them over the 2 side (short) arm pieces (B) assembled in Step 3. Make sure that the pre-drilled holes in the short sides of the corner pieces are facing up on both sides of the spa. The E-Z Lifter should now have the basic rectangle or square shape (see Figure 3),
Lay the top portion of the E-Z Lifter on top of the spa and the bot-tom portion at the base of the spa from the point at which the E-Z Lifter is to pivot. Double check any measurements to ensure that the E-Z Lifter will raise and lower without hitting the sides of the spa. Ensure that the bridge-arm on top falls 1/2" short of the cover seam (see Figure 4).
FIGURE 3
NOTE: To ensure that the screws do not damage the cover, make sure that the pre-drilled pilot holes of the top corner pieces are facing toward the mounting blocks.
FIGURE 46. After ensuring your measurements are correct, secure all self tapping screws (F) through the pilot holes of the corner pieces (A) into the bridge-arms (C) and side arms (B) Attach the mounts blocks (D) to the base of the spa ensuring that they lie between the pre-drilled pilot holes of the lower corner pieces (see Figure 3). The E-Z Lifter should now be in its final, rigid form.
7. Fold the cover over the E-Z Lifter and raise it to an upright position
(the cover should hang vertically) Holding the safety chain (E) level to the ground and below the spa lip, mark the position of one end of the chain on the cabinet and the other end on the respective side arm (B) on the inside (see Figure 5).
8. To mount the Safety Chain (E) to the cabinet, mount the Chain Mounting Bracket (K) to the spa cabinet using 3 Wood Screws (M) centered on the mark that was made on the: cabinet.
NOTE: If the Chain Mounting Bracket (K) cannot be mounted to the spa cabinet (for example the spa has a rounded board that overhangs the edge of the spa) please go to step 8a.
NOTE: Ensure the mounting bracket is oriented in such a manner that one point of the triangular bracket is pointing in the direction of the wood grain (If wood grain is horizontal, one side of the triangular bracket must be vertical. If wood grain is vertical, one side of the triangular bracket must be horizontal).Put s Flat Washer (J) onto a Machine Screw (F) followed by the Safety Chain (E) and another Flat Washer (J). Then, thread the screw into the center hole of the. Chain Mounting Bracket (K) until the screw is tight. Back the screw out 1/2 turn to allow the chain to turn freely (see Figure 5). Please continue with step 9.
8a) Mount the Safety Chain (E) to the spa cabinet using a Metal Screw (F). Put a Flat Washer (J) on the Metal Screw(F) followed by the Safety Chain (E), followed by the Plastic Grommet (N). Thread the Screw (F) into the spa cabinet where marked until the screw is tight. Then back the screw out 1/2 turn to allow the chain to turn freely (see Figures 5a and (6).
9. Now mount the Safety Chain (E) to the inside of the Side Arm (B), that was marked in Step 7. Put a Flat Washer (J) onto the Metal Screw (F). Followed by the Safety Chain (E), followed by another Flat Washer (J) and carefully thread the Metal Screw (F) into the side arm until the screw is tight. Then back the screw out. l/2 turn to allow the chain to turn freely (see Figure 5).
10. Repeat Steps 7-9 for mounting the chain on the other side of the spa.
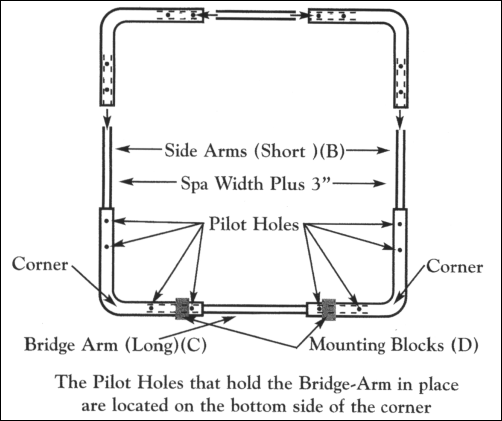
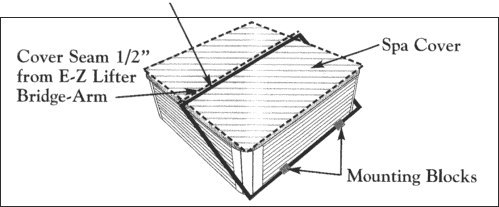
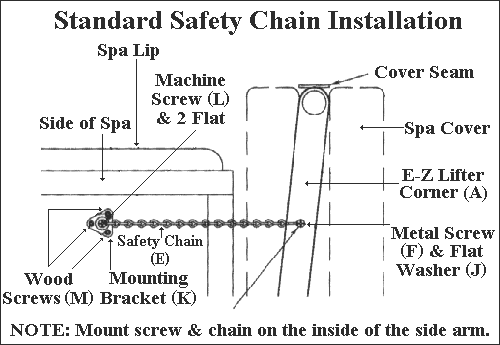
FIGURE 5

FIGURE 6
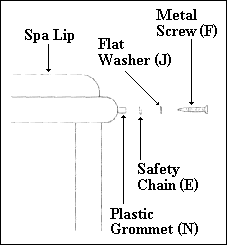
FIGURE 7