


The Cover-Up
Protect your spa cover and your back with the innovative Cover Up spa cover lift!
Featuring The Universal Cover Lift Mounting System


|
The most significant, aspect of the COVER UP! is the "VersaMount", a universal deck/cabinet mounting bracket. The VersaMount is fitted with small, powerful torsion springs to assist the cover on and off the spa. With this Torsion Spring System, the COVER-UP! is less reliant on safety cables for slowing the momentum of the cover, thereby averting careless cabinet damage, or cable failure. With this Torsion Spring System, putting the cover back on the spa can be done with only one finger and shock loads to the cabinet imposed by "less than careful" cover removal are reduced. This helps protect both cover and the spa. This unique and versatile mounting system accommodates virtually any spa up to 8 feet wide. This strong mounting bracket is versatile enough to be attached to the side of the spa cabinet or fastened to the deck, to allow for a wider range of spa shapes and sizes. If attaching the mounting brackets to the side of the spa or deck is not practical, an optional Mounting Plate can be used. This T-6 Aluminum mounting plate slides under the spa and the cover lift is attached to it. This versatile mounting system works with most most spa applications up to 8 feet wide. |

 Engineered for either spa side
or deck mount, the advanced-design of the COVER UP! utilizes "forward
fulcrum" to assist in lifting your spa cover on and off your spa. This advanced
design, along with exacting tolerances, allows for the easiest of installations on the
widest variety of spas.
Engineered for either spa side
or deck mount, the advanced-design of the COVER UP! utilizes "forward
fulcrum" to assist in lifting your spa cover on and off your spa. This advanced
design, along with exacting tolerances, allows for the easiest of installations on the
widest variety of spas.
 |
Coverplay, Inc. brings over 15 years of engineering creativity to the cover
lift industry.
Our COVER-UP! lift was the first cover lift to introduce a universal lifter mount, the VersaMount. This versatile mounting system allows the lift to be mounted to the spa cabinet or the deck. Our newest product, the COVER-PRO lift, integrates to the cover and saves up to 40% in energy costs. Our cover lifts are built with advanced engineering and quality craftsmanship.
|
|
||||||||||

| The COVER-UP! spa lift works by allowing you to safely lift and store the spa cover. By helping with the lift, this allows for one person to lift the cover without risk of back injury. The cover is also stored off the ground which will keep your cover looking new and last longer. | ||
 |
 |
 |
Step 1 Unlock the spa cover straps, lift the front half of the cover and fold the spa cover over the COVER-UP spreader bar and horizontal bars. |
Step 2 Grasp the cover handles at the rear of the spa and pull gently until the cover is in the vertical position, or step into the spa and push gently while lifting the cover to guide it into the vertical resting position for storing. |
Step 3 Relax in your spa. That's all there is to it! You cover is now easily removed and safely stored. |
| To recover, stand up in your spa and gently pull the cover toward you as you step back to exit the spa. Step out of the spa, close the cover, and relock cover straps for saftey. | ||

Protect your COVER and your BACK!
COVER UP!
Spa Cover Lifter
Installation / Operating requirements and limitations |
||||||
| rear clearance | side clearance | spa/cabinet shape limitations | mounting location | spa corner shape limitations | type of lift assistance | min. [max.]cover width |
| 18" | 5" | none | deck or spa side | none | spring assist | |
See the complete Cover Lift Configurater to compare all cover lifters side by side. |
||||||


Click on pictures above for a larger view
Installation Instructions for the Cover Up

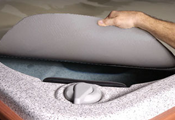
What's actually inside the box.
Congratulations on your purchase of the COVER-UP! cover lifter.
We at Coverplay Inc. are sure you will get years of trouble-free use from your new COVER-UP. A number of U.S. patented engineering features make this product the safest and easiest cover lifter available. Please take the time to read the instructions before assembling the COVER-UP, as this should make the task much easier.
Thank You!
Tools Needed:
- Power drill/driver with a #2 Phillips head
- 1/8" drill bit, 5/32" drill bit
- Measuring Tape
- Pencil
Check to be sure that you have each component listed here:
Parts List:
2 -- Horizontal Bars
1 - - Spreader Bar
2 -- Pending Arms
2 -- Safety Cables with attached Cabinet Brackets
1 -- Bag of screws containing 12 long wood screws, 8 short wood-screws and 12
self-tapping screws, (extra screws provided).
Please read the following instructions to familiarize yourself with the components before assembling your COVER-UP.
1) Begin by centering the Spa Cover on the spa.
2) Select the right and left PENDING ARMS and check each VersaMount bracket to assure free rotation. (These will need to be lubricated periodically) Position these brackets on opposing sides of the spa cabinet on the end of the spa from which the cover will be suspended, approximately 7" from the true corner. Decide whether you want to use the cabinet mount or deck mount, then mark the bracket holes for appropriate attachment, making sure they are equidistant from each comer. Pre-drill pilot holes with the 1/8" drill bit to prevent cracking, and attach the brackets with the 6 long screws to the cabinet, or the deck, with just 4 of these screws. If frame wood is unavailable for the cabinet application, a block of wood behind the cabinet skirt for stability works well.
3) Loop one SAFETY CABLE over each of the installed PENDING ARMS.
4) Remove the HORIZONTAL BARS from the box and place the longer ends on the spa cover at the fold, with the short ends suspended.
Adjust the distance to be slightly wider than the spa cover and cabinet, then center the SPREADER BAR over the long ends.
5) Slide the HORIZONTAL BAR ASSEMBLY into the Pending Arms and adjust the distance to be just at the fold of the cover.
6) Check to be sure the Spreader Bar is centered then rotate it to position the holes parallel to the spa cover, facing the end designated for cover storage Using a drill/driver, pre-drill 5/32" pilot holes to install the self-tapping screws ( In this position, the screws won't chafe the cover).
7) Maintaining the measured distances, secure the Pending Arms to the Horizontal Bar Assembly with a drill/driver and the self-tapping screws provided Again, 5/32" pilot holes make this task much easier.
8) Fold the spa cover over the HORIZONTAL ASSEMBLY and carefully suspend it in its desired resting position, just behind the cabinet While maintaining the cover in this position, (an assistant is helpful here), fully extend the SAFETY CABLES to the upper frame of the cabinet, and mark the position of the holes to be drilled When fully extended, the Safety Cables would be parallel to the floor and not interfere with the smooth transition of covering or uncovering the spa.
9) Rest the cover on the spa, (it 's easier to install the brackets), and pre-drill 1/8th" pilot holes to prevent cabinet cracking, then install with the short wood screws provided (over tightening these screws can reduce the free movement of the swivel post, for which it is designed).
Notes:
Your COVER-UP! cover lift offers adjustable positioning of the stored cover. Locating the VersaMount brackets toward the center of the spa cabinet will store the cover lower...closer to the corner of the cabinet will elevate the cover for more privacy.
If your COVER-UP! is equipped with "Halo" torsion springs and you want the spring to assist in both directions, install the SET SCREW for the spring return after installation is completed.
The COVER-UP! cover lifter is designed to be used with most spas and spa covers manufactured today. If you have a question regarding your application, please contact your COVER-UP! dealer or distributor.
COVER-UP! is not designed for damaged or water permeated covers.
Experienced installers find it simple to attach the PENDING ARMS to the cabinet first, then fully assemble the system into its respective position, allowing for some space on each side of the spa, then carefully stabilizing each section with one tapping screw, then positioning the lifter so as to gain easier access to install the remaining screws.
Remember, to position the safety cables on the pending arms before installing the screws.
The screws in the Spreader Bar must be installed parallel to the cover to avoid abrasion

