


The Cover Valet
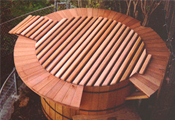
Whether your spa is free-standing or built into a deck, this low profile spa cover lift works where others can't, inside a gazebo, up against a wall, even inside a spa room or greenhouse! The high quality, locking pneumatic pistons assist you to make lifting your spa cover a breeze!

The Cover Valet is the world's leading premium spa cover removal system. It is designed to fit in almost any backyard environment: inside of a gazebo, against a wall, or even mounted into an existing deck. The Cover Valet has two heavy duty zinc coated metal frames that are attached to the side of your portable spa cabinet or to the decking next to your inground spa. Dual gas shocks assist in effortlessly lifting and lowering the spa cover. A locking safety feature holds the cover open until it is time to be closed. With its durable powder coat finish, stainless steel hardware and ease of installation, the Cover Valet to be equipped with an industry
- Requires only 4"-6" of clearance.
- Works inside most gazebos.
- Mounts to edge of spa cabinet or directly to deck.
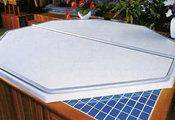
- When cover is open, it doubles as a privacy wall.
- Durable zinc plated and powder coated finish.
- Highest quality stainless steel hardware.
- Accessory brackets are available to fit specific spa manufacturers' needs.
- Compact packaging for easy, low-cost shipping and handling.
- Features a five year limited manufacturer's warranty.
Installation / Operating requirements and limitations |
||||||
| rear clearance | side clearance | spa/cabinet shape limitations | mounting location | spa corner shape limitations | type of lift assistance | min. [max.]cover width |
| 6" | 0 if top mounted. 3" if side mount | not for round or octagon spas | deck or spa side | will not fit radius over 20" | gas shock | not applicable [100"] |
See the complete Cover Lift Configurater to compare all cover lifters side by side. |
||||||


Click on pictures above for a larger view
|
|
Installation Instructions for the Cover Vallet

What's actually inside the box.
BEFORE YOU START: Determine whether your spa will need a Top Mount or a Side Mount installation. Look at diagrams on left and see which one best resembles spa type for installation.

 |
TOP MOUNT & SIDE MOUNT INSTRUCTIONS: 1. Attach Ball Stud to Channel Bracket using 1-Ball Stud and 1-Lock Nut (per side). Attach other Ball Stud to Pivot Arm using 1-Ball Stud and 1-Lock Nut (per side) 2. -VERY IMPORTANT- Position spa cover (in closed position) on spa. Position rear of Channel Bracket approx. 2 inches forward from back edge of spa cover. Make sure Channel Bracket is parallel to side of spa cover.
3. Slip covers over both ends of bars of Extension Arm before sliding arm bars in position on cover (see next page). 4. Attach Pivot Arm to Channel Bracket using (1) 1 3/4 " Hex Bolt, (1) Lock Nut (per side) Lock Nut can be placed on the inside or outside edge of spa (as allowed by specific spa manufacturer). DO NOT OVER TIGHTEN! 5. Click "Latching" Gas Shock onto Ball Stud of Channel Bracket ONLY on most convenient side of spa (thick section to Channel Bracket and thin section to Pivot Arm), leaving shock laying down. Click "Regular" Gas Shock onto Ball Stud of Channel Bracket ONLY (thick section goes to Pivot Arm and thin section to Channel Bracket), leaving shock laying down. 6. With spa cover on, but off front 1/4 " way, slide Extension Arm bars in position on each side of cover (There is a left & a right arm). Fig. 5 Front bar slides into middle of cover, while 2nd (top) bar lays on top of cover. Fig. 6 Push cover from front slowly and evenly, keeping cover centered over spa. Fig. 5
|
 |
|
 |
|
 |

7. Keep pushing cover evenly until Extension Arms slide into pivot arms. When cover is centered over spa (measure carefully on both sides) See Fig. 5 Secure Stabilizer Bar AND Extension Arm to Pivot Arm using 5/8" Hex Bolt. If spa rim is greater than 5 inches, secure Stabilizer Bar parallel with Pivot Arm. 8. Fold back front half of cover & manually lift cover to open position. Lift shock up & click on to Ball Stud on Pivot Arm (both sides). 9. Attach Elastic Strap/Ball to front bar on Extension Arm. (Use to lower cover instead of pulling on spa cover). |
 |

You can print this page if needed, or also download the instructions in a PDF file for Acrobatreader.
|
|